This site is hosted on GitHub Pages. I wanted to be able to just be concerned with writing articles and commiting them to the repository; I didn’t particularly want to have to build the site locally and then commit that to the master branch. That’s where Travis-CI came in.
Travis-CI is a continuous integration platform which can link into GitHub and take action based on commits to the repository. In essence my workflow is as follows:
- Write and test my article locally.
- Commit the new article to the source branch of my GitHub Pages repository.
- Sit back and relax as Travis-CI takes care of building the site from the source, and pushing it back to the master branch of my repository.
Step 3 is what this article is about; it took me some time to get my .travis.yml file configured correctly so if you’re looking to do the same thing this will definitely help.
I use Hugo to power my site. All of the examples I found where people used Travis-CI with Hugo caused me issues. I had many problems with Go not being able to download dependencies into the VM that Travis deployed for the build. So in the end I took a different, simpler tack. Here’s my .travis.yml file (You can also see it in the repo itself at https://github.com/rokett/rokett.github.io/blob/source/.travis.yml.
before_install:
  - wget https://github.com/spf13/hugo/releases/download/v0.16/hugo_0.16-1_amd64.deb
  - sudo dpkg -i hugo_0.16-1_amd64.deb

before_script:
  - git config --global user.name 'rokett'
  - git config --global user.email 'rokett_deploy@something.com'

script:
  - hugo

after_success:
  - mkdir .deploy
  - cd .deploy
  - git init
  - git remote add origin $DEPLOY_REPO
  - cp -r ../public/* .
  - git add -A .
  - git commit -m 'Site updated'
  - git push --force --quiet origin master
Let’s see what that does.
before_install
These two lines download the 0.16 build of Hugo and install it. Previous versions of this process I found built Hugo directly from source, but installing it from a package is much simpler.
before_script
Here I’m just configuring some Git settings.
script
Running hugo builds the site. That’s it. The built site is located in a directory called public.
after_success
Assuming that the hugo command completed successfully, this block will run.
Firstly it creates a new folder called deploy and initialises a new Git repository in it. It then adds the master branch of my GitHub Pages repo as the remote (I’ll come on to the $DEPLOY_REPO variable in a minute). Next it copies the contents of the public folder (that’s where the build site is remember) into the deploy folder, adds and commits all of the files to the local Git repo, and then pushes it to the master branch.
At this point the production site is updated and live.
So what’s with the $DEPLOY_REPO variable?
To be able to push to the repository, you need to create a personal access token from GitHub that Travis can use. This token needs to be prepended to the URL you use to push to the repository. In order to keep this token secret, I created a variable called $DEPLOY_REPO in Travis which can then be used in the .travis.yml file.
Create the Personal Access Token in GitHub
Log into your GitHub account and go to your account settings. From the menu, select Personal access tokens.

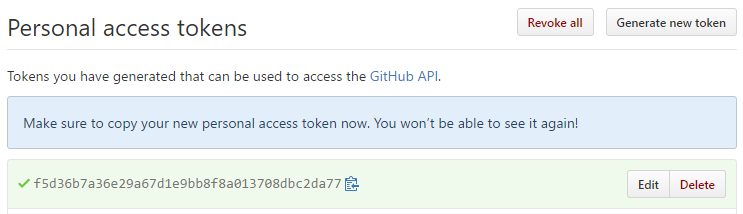
Select Generate new token and enter the settings as per the screenshot below.
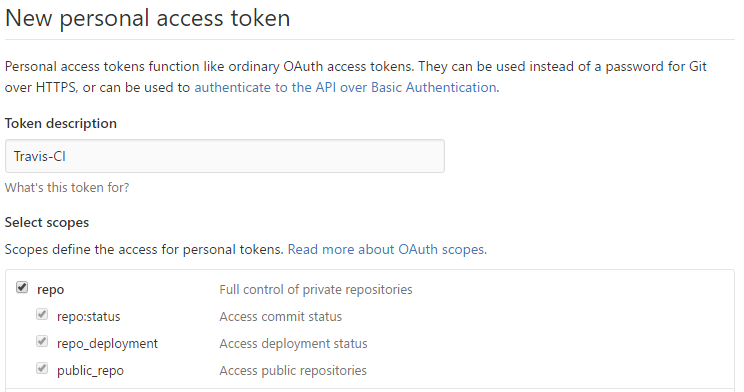
You’ll now be shown the token. Copy this ready for the next step.
Add the $DEPLOY_REPO variable to Travis-CI
In the Travis-CI console, go to the Settings of your repository and add a variable as per the screenshot below; replace {token} with your own token.
